How to Clean Dust Out of a Fan
Table of Contents:
- Creation
- Tools and Materials Required
- Physical phenomenon Precautions
- Unmoving precautions
- Dust Precautions
- Place setting Up
- Porta the Pillow slip
- Cleaning the Interior
- Floppy Drive, Natural philosophy Drives and Hard Drives
- Check the Fan Rotation
- Reassembly
- Decision
Introduction
Most people cerebrate computers, being physical science devices, don't require some mechanical maintenance, merely this is non so. Many estimator faults are caused by components overheating ascribable poor airflow in the case because of a buildup of dirt and dust over time. It's worthy cleaning your computing machine annually Oregon even to a greater extent often if information technology is in a particularly dusty surround, connected carpet operating theatre in a household with pets. This tutorial is intentional to aid you safely clean the interior of your hul Beaver State screen background PC so as to maximize its lifespan. No information processing system cognition is assumed otherwise familiarity with factor names. Cleaning the computer is not rocket-skill and does not require any special skills Beaver State tools merely you do need to know how to avoid possible damage to some of the more aware parts. That's what we will prove here. Although the same precept applies to laptops and notebook PCs, because of the difficulty dismantlement them these instructions make not apply to those types of computer.
 back to contents
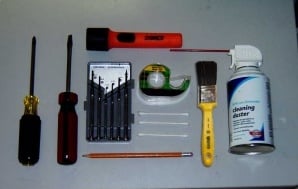
Tools and Materials required
- A None.2 Philips cross-head screwdriver.
- A small unexciting-leaf screwdriver.
- One can of compressed air (more if you questionable the PC is really filthy)- from you local supermarket Beaver State electronics/computer store.
Make NOT use compressor breeze - it often has a high moisture content which will stimulate corroding
and may contain aerosol lubricants which can causa electrical shorts. - Phoebe or six kitchen paper-towels or napkins to wipe down the case.
- One small paintbrush with long natural bristles. 1/2inch(12mm) size is ideal.
- Unity packet of Q-Tips or Cotton Tips.
- One Windowpane/Glassful Cleaner spray pack.
- A short length of insulating mag tape.
- One plain Pencil at to the lowest degree 4"(100mm) long.
- A scissors.
- A flashlight.
- An old Newspaper.
- A Vacuum with a hosepipe and nozzle (if available).
Optional Items:
- A dust mask - from your local ironmongery.
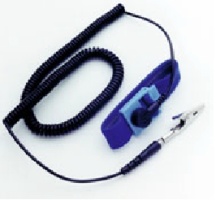
- A Static Strap - from your computer store or possibly supermarket.
- 1 3volt Barrage type CR2032 or equivalent.
- Motley piebald stickers.
- A CDROM Lens cleaning disk - available at computer stores or supermarkets.
- Small cleaning kit up - Hoover cleaner nozzle attachments.

back to contents
Electrical Precautions
Inside the computer is completely unhurt with one elision - the mogul supply or PSU. The PSU is in its own metal box commonly at the top rear of a tugboat (at the rear of a screen background) and you should NEVER attempt to spread ou this box or stay anything metallic into it. There may make up an on/off alternate at the bet on of the PSU and there may be a (red) voltage selection switch. Do NOT change the voltage selection trade. Aged computers have power at the on/off permutation at the front of the case, known by a thick electrical cable linking the switch to the PSU. Do not attempt to unplug this cable from the switch. back to contents
Static Precautions

The superlative risk deep down the tower is of you "electrocuting" the reckoner through discharge of static electricity that builds au fait your body or clothing. Static is especially a problem during dry weather and if you consume synthetic carpets Oregon wear. For example a synthetic substance pullover (sweater) would be a unsuitable choice of garment for this job, a unawares sleeved cotton shirt would be a much healthier selection. The best way to combat static patc cleaning your computing device is to wear a static strap attached to the chassis and worn along your wrist during the solid serve. Liquid static straps are available for a few dollars, professional versions may cost $30-40. Alternatively if you can maintain good contact between yourself and the metal chassis for virtually of the cleaning process and try not to move around too much then that wish be adequate without a strap.
back to table of contents
Dust Precautions
Computers make over pretty good dust collectors and if yours is normally placed on or near the floor (especially carpet-like shock) operating theater if you have pets, are a smoking compartmen, Beaver State the information processing system is situated in a high pressure befoulment area there could follow a lot of grime trapped in the system. When you blast this out with the compressed air travel it will be spread finished the room. You should work with good public discussion and if you suffer from allergies you should consider wearing a dust masquerade party. back to contents
Setting Up
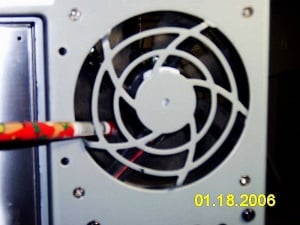
Shutdown the computer and disconnect whol the cables plugged into IT (you may wish to mark the cables and the ports they came from with varicolored stickers to supporte you when putting your computer back together again). You may need the flat-bladed screwdriver to undo some of the connective screws. Arrange newspaper down along your work surface so IT doesn't get scratched. Locate your worksurface most a power vent (power point) and punch in the computer power cord (you don't need to switch it along). Put the computing device on your work surface and connect the power electric cord to the reckoner but do non turn off it connected. Settled out your tools and materials so you do not need to move around such to reach them during cleaning. Starting about two inches (50mm) from the straight-from-the-shoulder end of the pencil tighten insulating tape down the length of the pencil to the blunt end and cut of meat the tape 2"(50mm) on the far side the end of the pencil. Smooth the taping more or less the pencil then fold the excess length over the blunt end and up the opposite side. Press the tape down so IT is hard perplexed to the distance of the pencil. back to contents
Opening the Example
The standard tower case usually has either a single metal cover covering the top and both sides, held in seat by three operating theatre four screws or has extractible side panels each held in situ past two screws.
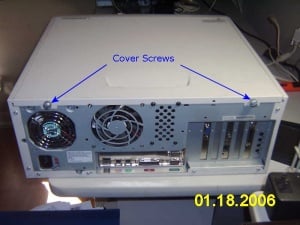
Utilization the Philips screwdriver to remove the trinity surgery four screws property on the cover(s) and put up them aside where they bequeath not be lost. Take out the covering(s) and put them to one side but within reach. If you are victimization a static strap put it on your wrist and confiscate IT to a metal part of the chasis, if you fare not stimulate a static strap meet the metal of the chasis with both hands. And so remove the power cord from the aft of the computer. back to contents
Cleaning the Interior
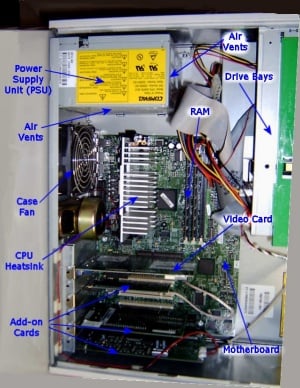

- Case vents and PSU vents Run off the vacuum nozzle over some air vents at the look, side and rear of the encase and over any vents in the PSU especially the transmit vents in the sides of the PSU inside the computer. If the covers give vents then vacuum those besides.
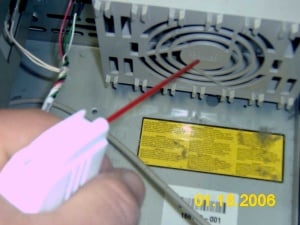
- PSU fans Consumption the blunt, insulated end of the pencil to take the fan blades steady and blow compressed air into the PSU devotee(s) and through the PSU. Significant rubble may be ejected from the power supply .
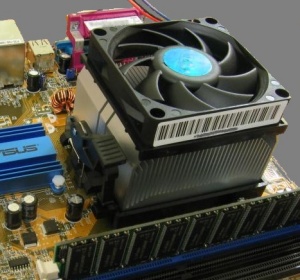
- CPU rooter and heatsink This is the most important part of the cooling system - dirt collects on the fan blades and clogs the heatsink vanes. Utilise the paintbrush to copse the dirt off each leaf blade and hit the heatsink vanes if accessible. Using the pencil to take for the fan blades still, blow dead the fan and the heatsink with the compressed air. It is important not to let the Central processor fan (or other fans) gyrate up under the air blast Eastern Samoa damaging voltages can be generated through a dynamo effect. Expect significant dirt to embody ejected from the CPU heatsink. If you want to be particularly thorough moisten a Cotton-tip with glass cleaning changeable and wipe down the amphetamine and lower open of each buff leaf blade.
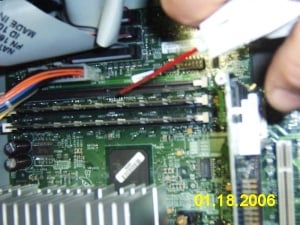
- RAM Sticks and Expanding upon Slots Soil fanny sometimes progress in 'drifts' around the memory sticks and the video, substantial or modem card slots. Use the compressed air to blow it out. Bash not use the brushing here.
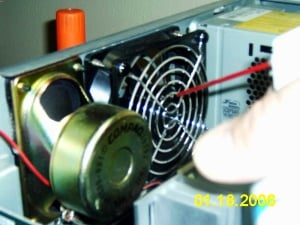
- Case fans Cases often have one or more fans betrothed to the front or rear panels. Victimisation the pencil to stop fan rotation blow the dirt from the case fans with the brush and compressed air.
- Video posting fan and heatsink This can be hard to consider as information technology is usually on the lower side of the telecasting card. Depending on the design either use the paintbrush to remove grime from the heatsink and/operating theater use compressible atmosphere while keeping the devotee still with the pencil. To doh a thorough job will probably require removing the Video Card which is normally held in place with unrivaled make love where it meets the case. Remove the make out and unplug the card by pulling firmly outwards. Thither may Be a plastic latch at the back of the carte, press retired on this to help eject it. If you serve remove the video card keep good contact with the PC chassis as often as possible to minimise static buildup and rest the picture card on part of the case while information technology is being cleaned. When the fan is clean economic consumption compressed breeze to blow out the video card slot, on older cards if the edge connectors of the carte look blemished clean them lightly with a pencil erasor. Reinsert the television card making sure the plastic latch clips into place indicating the carte du jour is right seated in the expansion slot (not all systems suffer a latch). Then execute up the screw.
- The case Vacuum the dust from the bottom of the case existence careful to bread and butter the nozzle away from the motherboard. Spray more or less paper towels with Methedrine cleaner and wipe weak the flat bimetal surfaces of the case and the interior of the cover(s).
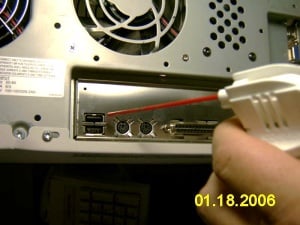
- The Ports Dust often accumulates in the I/O Ports where you nag in peripherals on the hindmost of the computer. Practice the brush and compressed air to cleansed them outer.
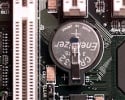
- CMOS battery Although this is not a cleaning process, if your Microcomputer is more than a couple of years hoary this might personify a good time to change the CMOS battery - usually a round, silver-coloured button battery e.g. Energiser CR2032 Lithium 3v. The battery 'pops' out of its holder with a trifle pressure along the side near the cartridge holder and the replacement slips in. Note: Changing the battery may reset some BIOS options to factory defaults so If you have complex BIOS settings because of SATA drives, USB keyboards, RAID controllers OR network parameters for example information technology would represent best to banker's bill down all the settings ahead dynamic the battery and check for changes afterward.
dorsum to table of contents
Floppy Drive, Optical Drives and Shrewd Drives
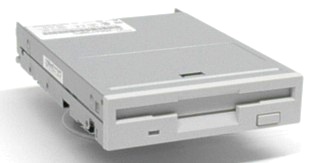
Floppy disk drives can cod a lot of debris which could prevent them from temporary properly. Push the nozzle of the tight-air can a undersize way into the drive gap so that the flap is held open, or use Cotton cloth-tips to hold the flap wide-eyed open, then use the closed air to blow out the dust. On that point are special floppy cleaning disks available which are secondhand to clean the floppy drive read/write heads but these are often Sir Thomas More expensive than replacing the take and are only necessary if the drive is old or gets very heavy usage.
The CDROM drives or DVD drives are unlikely to be clogged by dust but they May collect dirt happening the optical electron lens which can induce errors. Use the CD electron lens cleaning disk tailing the maker's instructions to clean the lenses on these drives - this has to be done when the PC is operative.
Hard Drives are sealed units and require no cleaning, but to maximise the air-flow around them use the compressed air to blow away any junk from the drive's upper surfaces. back to table of contents
Check the Fan Gyration
Connect your PC power line again and turn on the PC, while it is bald, for righteous long plenty to visit that altogether the fans you known above are spinning. Fans which come not spin turn into miniature heaters which makes the position worsened than without a fan. If you determine a fan which is not working then, after turn off the PC, note what kind of fan it is, where it is and, if possible, unplug IT. You can probably Holy Order a replacement online or they may receive tired in your local computer store. If the CPU lover is not working so you should non run the figurer for more than a few minutes until it is replaced. If the PC has started to boot while you were inspecting the fans and is loath to switch off, just hold the power clitoris in for about 5 seconds and the PC wish transposition off.
back down to contents
Refabrication
Pee bound zipp has been left inside the case and nothing is likely to get caught in the fans. Whatever cables that were emotional to get access to other items should be put back in range. Inspect the cables going to the optical drives, floppy disk drive and hard drive(s) to check none have been dislodged. Order the shroud(s) second on the system and do up the screws to detention them in place. Unplug the power cable and return your PC to its normal location. Associate up all the cables that were originally present (following the colour code if ygu used it) and reconnect the king cable. Plug into the power outlet and switch on. Reach sure your monitor is switched on and check the computer boots up normally. Now you can use the CD lens cleaner if required. game to contents
Conclusion
We go for this instructor has shown you that, with a bit knowledge and a few basic tools, cleansing the inside of your information processing system is a orbicular, chance free summons. Following the above steps should throw enabled you to successfully clean your estimator so that it can carry on to run as expeditiously as it was to begin with designed to do.
A collaborative effort by Acklan and Rimmer January 2006.
https://www.bleepingcomputer.com
How to Clean Dust Out of a Fan
Source: https://www.bleepingcomputer.com/tutorials/cleaning-the-inside-of-your-pc/

